User Guide

Tired of using paper or Microsoft Excel to track your student details? No worries, StoreClass is here to help!
StoreClass (SC) is a desktop app designed exclusively for teachers from private organizations e.g. tuition centers to manage their students. As teachers, you can interact with the app by keying in your commands to StoreClass’s chat bot, and your student details will be updated and saved automatically.
Paired also with a revolutionary Autocomplete feature, StoreClass helps you manage your student details more effectively, efficiently and most importantly, reliably.
Table of Contents
- Table of Contents
- Quick start
-
Features
- Viewing help :
help - Adding a student:
add - Listing all students :
list - Editing a student :
edit - Locating students by name:
find - Filter students :
filter - Deleting a student :
delete -
Undoing the last action:
undo -
Redoing the Last Undone Action:
redo - Grading a Module:
grade - Archiving data files:
archive - Load data files:
load - Clearing all entries :
clear - Exiting the program :
exit - Autocomplete
- Saving the data
- Editing the data file
- Viewing help :
- FAQ
- Known issues
- Command summary
Quick start
- Before you use our program, ensure you have Java
17or above installed in your Computer.- If you are using Windows 11, see here for an installation guide.
- If you are using MacOS, see here instead.
 Why do I need to install Java?
Our program is coded in Java. So in order for you to use it, Java will need to be installed on your machine. Think of it as the engine for our program.
-
Download the latest version of the
.jarfile of our program from here. -
Copy the file to the folder you want to use as the home folder for StoreClass.
- Open the terminal on your computer and run the jar file.
- How do I run a jar file using Terminal? See here
- After you run the jar file, A GUI similar to below should appear on your screen in a few seconds. Note how the app contains some sample data.

-
Type a command of your choice in the command box and press Enter to execute it. e.g. typing
helpand pressing Enter will open the help window.
Here are some examples of commands you can try:-
add n/John Doe p/98765432 g/male m/Physics: Adds a student namedJohn Doeto StoreClass. -
list: Lists all students and their details. -
delete 3: Deletes the 3rd student shown in the current list of students. -
clear: Deletes all students. -
exit: Exits the program.
-
- Refer to the Features below for a more detailed overview of each command.
Features
![]() Before you read on, here are some important notes about the command format that you need to know:
Before you read on, here are some important notes about the command format that you need to know:
-
Words in
UPPER_CASEare the parameters to be supplied by you.
e.g. inadd n/NAME,NAMEis a parameter which can be used asadd n/John Doe. -
Items in square brackets are optional.
e.gn/NAME [t/TAG]can be used asn/John Doe t/friendor asn/John Doe. -
Items with
... after them can be used multiple times.
e.g.m/MODULE...can be used asm/Mathematics,m/Biology m/Physicsetc. -
Items with
… after them can be used multiple times including zero times.
e.g.[t/TAG]…can be used ast/paid_tuition,t/paid_tuition t/smartetc. -
Parameters can be in any order unless specified.
e.g. if the command specifiesn/NAME p/PHONE,p/PHONE n/NAMEis also acceptable. -
Extraneous parameters for commands that do not take in parameters (such as
help,list,exitandclear) will be ignored.
e.g. if the command specifieshelp 123, it will be interpreted ashelp. -
If you are using a PDF version of this document, be careful when copying and pasting commands that span multiple lines, as space characters surrounding line-breaks may be omitted when copied over to the application.
Viewing help : help
You can view the help page using this command.

Format: help
Adding a student: add
You can add a student to StoreClass using this command.
Format: add n/NAME p/PHONE g/GENDER m/MODULE... [t/TAG]…
-
n/NAME: The full name of the student to be added. -
p/PHONE: The phone number of the student to be added. -
g/GENDER: The gender of the student to be added. -
m/MODULE: The module that the student is taking. -
t/TAG: The tag of the student.
![]() Here are the field constraints that you should be aware of
Here are the field constraints that you should be aware of
-
Names should only contain alphabets, hyphens, dots, commas, forward slash and spaces, and be between 1 and 100 characters long. Although / is allowed in names, you should use it carefully, input like m/ g/ n/ will still be recognised as prefix and may lead to unexpected behaviour.
-
Phone numbers should only contain numbers, and be exactly 8 digits long. This is because StoreClass is specifically targeting private education institutions in Singapore.
-
Gender should be either
maleorfemale, and is case-sensitive. -
Module should consist of alphanumeric characters and spaces only, and it should be between 1 and 30 characters long.
-
Tag should consist of alphanumeric characters only, and it should be between 1 and 30 characters long.
Examples:
-
add n/John Doe p/98765432 g/male m/Mathematics: Adds a student namedJohn Doeto StoreClass. -
add n/Betsy Crowe g/female p/12345678 m/Physics m/Chemistry t/OLevels t/new: Adds a student namedBetsy Croweto StoreClass.
Listing all students : list
You can show a list of all students in StoreClass.
Format: list
Editing a student : edit
You can edit an existing student in StoreClass.
Format: edit INDEX [n/NAME] [p/PHONE] [g/GENDER] [m/MODULE]… [t/TAG]…
- Edits the person at the specified
INDEX. The index refers to the index number shown in the displayed person list. The index must be a positive integer 1, 2, 3, … - At least one of the optional fields must be provided.
- Existing values will be updated to the input values.
- When editing tags, the existing tags of the person will be removed i.e adding of tags is not cumulative.
- Similarly, when editing modules, the existing modules of the person will be removed i.e adding of modules is not cumulative.
- You can remove all the person’s tags by typing
t/without specifying any tags after it.
Examples:
-
edit 1 p/91234567: Edits the phone number of the 1st person to be91234567. -
edit 2 n/Betsy Crower t/: Edits the name of the 2nd person to beBetsy Crowerand clears all existing tags.
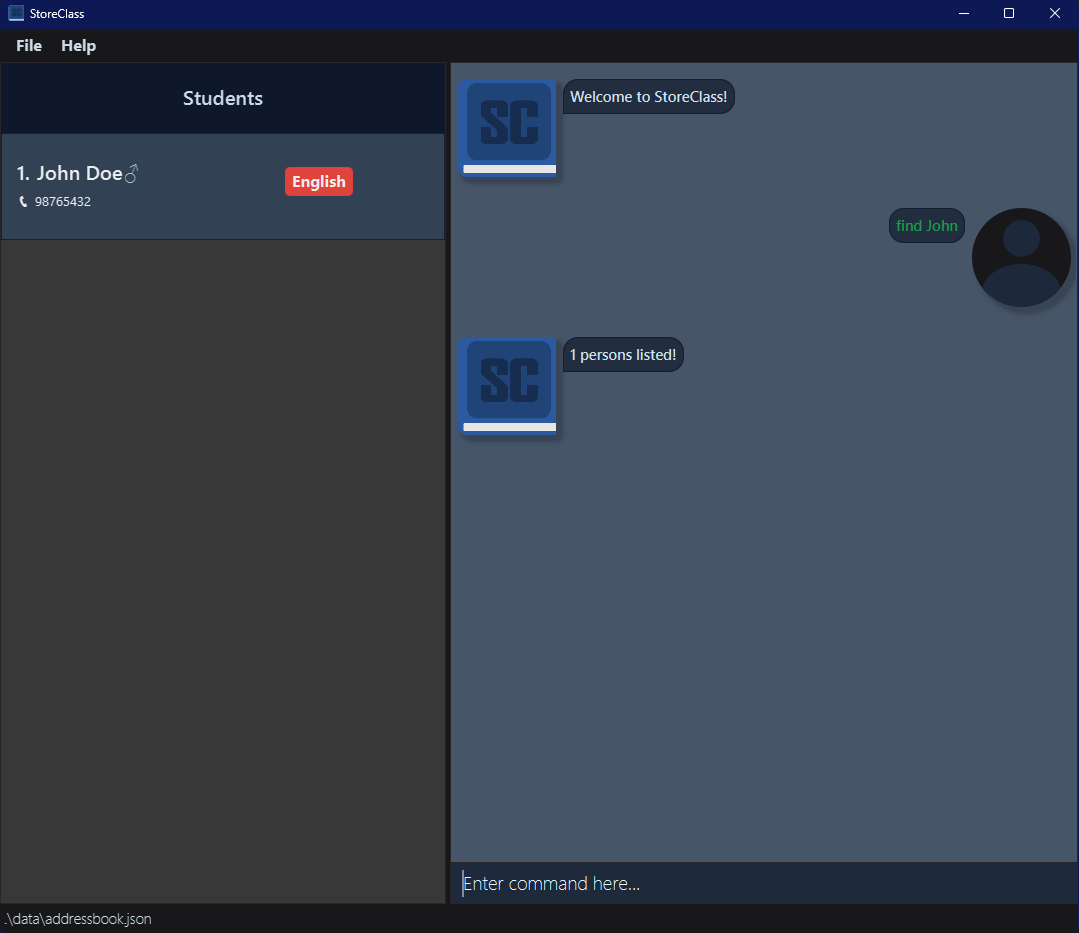
Locating students by name: find
You can find students whose names or tags contain any of the given keywords.
Format: find KEYWORD [MORE_KEYWORDS]…
- The search is case-insensitive. e.g
hanswill matchHans - The order of the keywords does not matter. e.g.
Hans Bowill matchBo Hans - Only the name and tags are searched.
- Only full words will be matched e.g.
Hanwill not matchHans - Students matching at least one keyword will be returned (i.e.
ORsearch). e.g.Hans Bowill returnHans Gruber,Bo Yang
Examples:
-
find alexreturnsAlex Yeoh(search by name) -
find colleaguereturnsBernice YuandRoy Balakrishnan(search by tag) -
find alex davidreturnsAlex Yeoh,David Li(search by multiple parameters)
Filter students : filter
You can filter students who meet all specified conditions.
Format: filter [n/NAME] [p/PHONE] [g/GENDER] [t/TAG]… [m/MODULE]…
- The filter is case-insensitive. eg
hanswill matchHans. - At least one of the optional fields must be provided.
- Only full words will be matched e.g.
Hanwill not matchHans, same to all parameter. - Filtering by
gradeis not supported. - Students matching all the given conditions will be returned (i.e.
ANDsearch). - Filters with empty tag will return all students.
![]() Note:
Note:
- Each parameter can only contain one keyword.
- This command works separately from the find command, e.g. you cannot execute a find command on a filtered list, and vice versa.
- Both filter and find cannot be chained, they will filter and find based on the entire student list every time you execute them.
Examples:
-
filter n/alex: returnsAlex Yeoh(filter by name) -
filter g/male t/new: returnsJames Li,Roy BalakrishnanandLinus Koo. (filter by gender and tag) -
filter g/male t/new t/OLevels: returnsDavid Li(filter by gender and multiple tags) -
filter g/female t/IB m/Physics: returnBernice Yu(filter by multiple conditions)
Deleting a student : delete
You can delete a specified student from StoreClass.
Format: delete INDEX
- Deletes the student at the specified
INDEX. - The index refers to the index number shown in the displayed student list.
- The index must be a positive integer 1, 2, 3, …
Examples:
-
listfollowed bydelete 2deletes the 2nd person in the address book. -
find Betsyfollowed bydelete 1deletes the 1st person in the results of thefindcommand.
Undoing the last action: undo
The undo command allows you to reverse the last action performed, helping you recover any data that may have been unintentionally deleted or modified.
Format: undo
How it works:
- When you perform an action that modifies the address book (like adding, editing, or deleting an entry), that action is saved in memory.
- By executing
undo, the most recent modification is reverted, and the address book is restored to its previous state.
![]() Tips: for Efficient Usage
Tips: for Efficient Usage
-
Use Undo After a Mistake: If you accidentally delete or modify a contact, you can quickly use
undoto revert the last action and restore the previous state.
-
Undo Works Only for Modifying Commands: Only actions that modify the address book (like
add,edit, ordelete) can be undone. Commands likelist,filter, orfinddo not trigger the undo mechanism. The reasoning behind this is that we consider them as view commands, not action commands that alter student data. -
Undo Resets to Full View: After using
undo, the program will display all students in the address book, letting you confirm that your last change has been successfully reverted.
undo not work after I run list, filter, or find? undo only works for actions that modify the address book. Since list, filter, or find do not modify the data, they do not impact the undo history.
add, edit, or delete) will clear the redo stack. This means once you undo an action and perform another modification, you cannot redo the previous undone action.
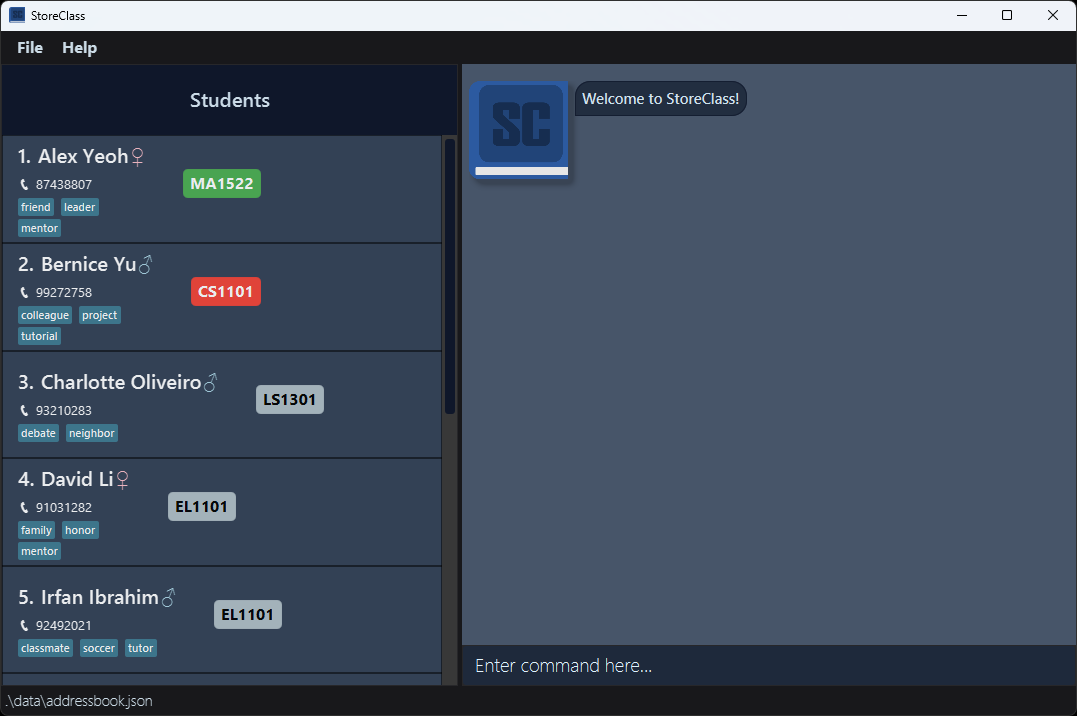
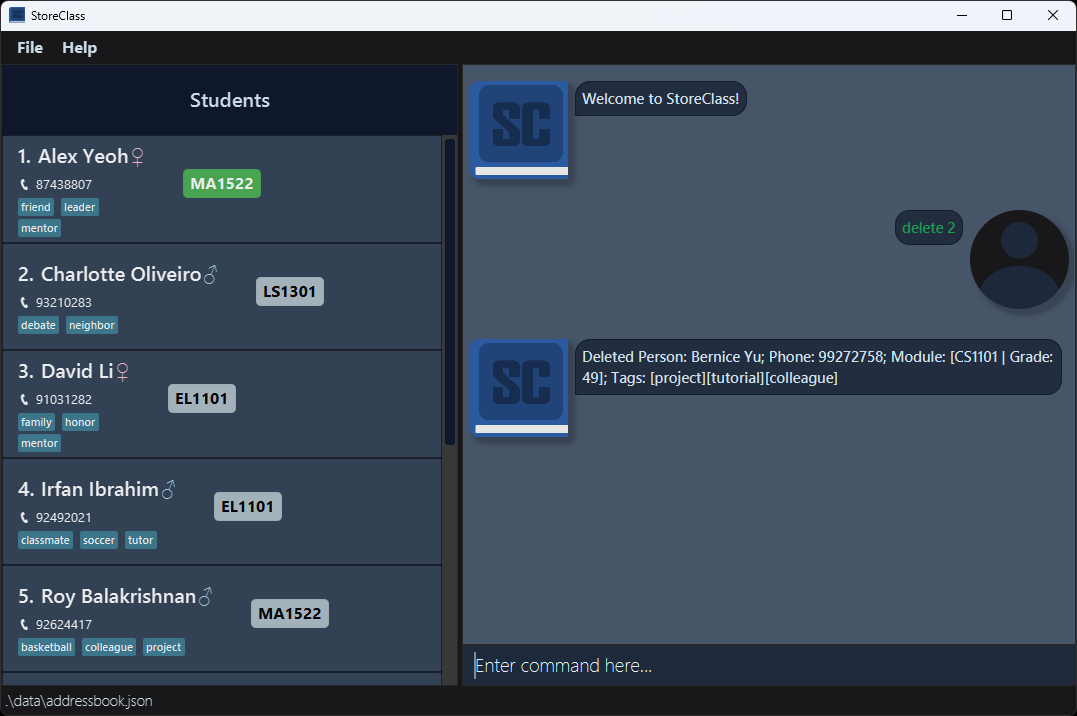
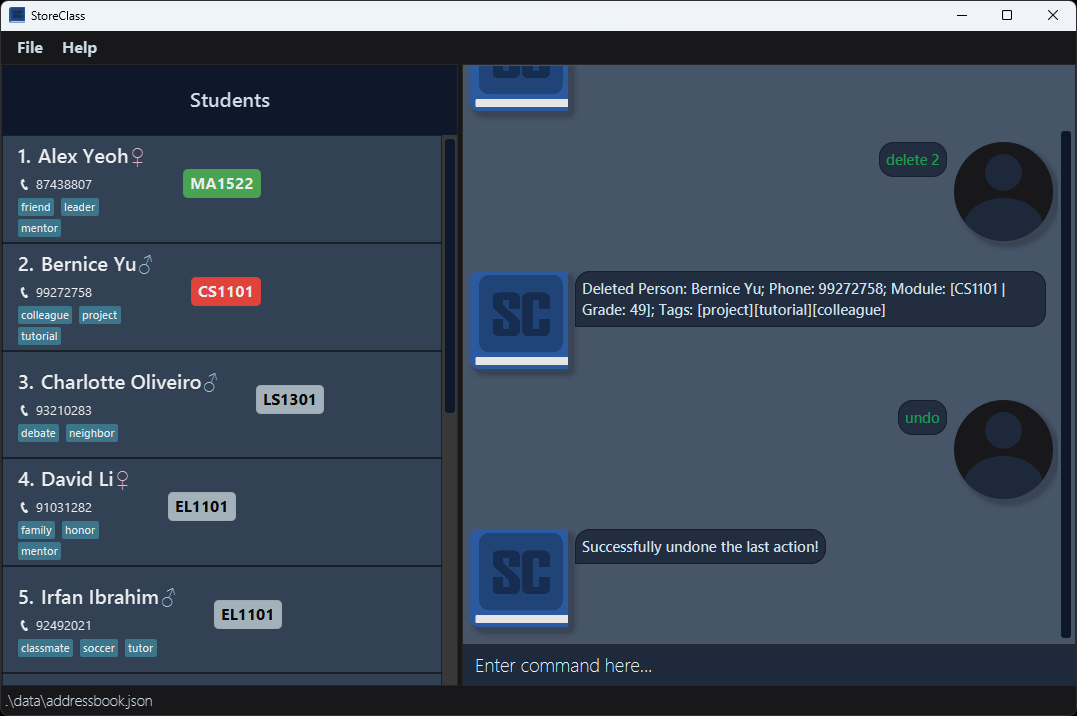
Example Scenario:
- You delete a contact.
- Before Delete: [Initial State]
- After Delete: [After Delete Command]
- You decide to undo the delete action.
- After Undo: [After Undo Command] – The deleted contact is restored.
[Initial State]
[After Delete Command]
[After Undo Command]
Examples:
-
undowill revert the last command executed, restoring the previous state of the address book.
Redoing the Last Undone Action: redo
The redo command allows you to reapply the last action that was undone, restoring the previous state of the address book. This can be useful if you change your mind after undoing an action.
Format: redo
-
Note: Like
undo, theredocommand cannot be used with commands likelist,filter, orfind.
How it works:
- If you’ve used
undoto reverse an action, theredocommand will restore that action, essentially “re-doing” it.
![]() Tips: for Efficient Usage
Tips: for Efficient Usage
-
Use Redo to Restore Actions: If you’ve undone an action by mistake,
redolets you reapply the change quickly. It’s useful when you second-guess your decision. -
Redo Works Only After Undo:
redowill only work if an action has been undone previously. If you haven’t undone an action,redowill not perform anything. -
Redo Resets to Full View: After using
redo, the program will show all students in the address book, allowing you to verify that your last action has been reapplied successfully.
redo not work after I’ve made new changes to the address book? redo only works if there is a previous action that was undone. If a new action is performed after an undo, the redo history is cleared, and there is nothing to redo.
add, edit, or delete) will clear the redo stack. This means once you undo a change and then modify the address book again, you will lose the ability to redo the previous undone action.
Example Scenario (Continuation from Undo):
- You undo a deletion of a contact.
- After Undo: [After Undo Command] – The deleted contact is restored.
- You decide to redo the action and delete the contact again.
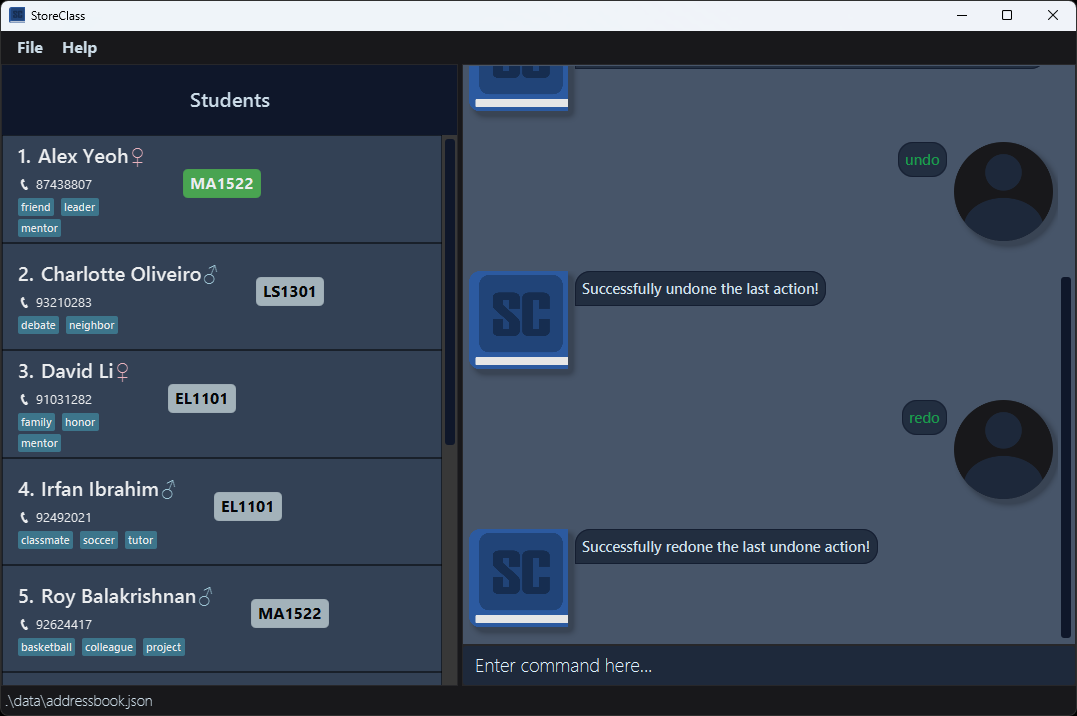
- After Redo: [After Redo Command] – The contact is deleted once more.
[After Redo Command]
Grading a Module: grade
You can assign a grade to a module that a student is taking.
Format: grade INDEX m/MODULE s/GRADE
- Assigns a numerical grade (between 0 and 100) to the module identified by the
INDEXnumber shown in the displayed person list. -
INDEX: The index number of the student in the displayed person list (must be a positive integer). -
m/MODULE: The module code to which the grade is assigned. The module match is case-sensitive. -
s/GRADE: The numerical grade (between 0 and 100) to assign to the module. - You can provide multiple
m/MODULE s/GRADEpairs to assign grades to multiple modules in a singlegradecommand. - The
m/MODULE s/GRADEpairs need not to be in order, see examples for illustration. - The grade can be any whole number between 0 and 100, inclusive.
![]() Important Note:
Important Note:
- Each module specified in the
gradecommand must be a module that the student is taking. - The number of
m/MODULEprefixes must match the number ofs/GRADEprefixes. - Grades are assigned to modules based on the order of the
m/MODULE s/GRADEpairs provided in the command.
Examples:
-
grade 1 m/Physics s/85: assigns a grade of 85 to Physics for the first student. -
grade 2 m/Chemistry s/90: assigns a grade of 90 to Chemistry for the second student. -
grade 3 m/English s/80 m/Chinese s/85assigns a grade of 80 to English and 85 to Chinese for the third student. -
grade 1 m/Math m/Chinese s/100 s/90will grade the first person’s Math to 100 and his Chinese to 90.
Archiving data files: archive
You can archive the current address book to a specific file name.
After archiving, you can find the archived file in the folder archived with the name FILENAME in the home folder that you’ve chosen to put the jar file of StoreClass in.
Format: archive pa/FILENAME
Example: archive pa/mybook.json
The file name must end with “.json” and must not contain any slashes “/”.
There should be only one file name provided.
Load data files: load
You can load data from an archived file into StoreClass.
You can only load from files under the folder named archived. This folder is located in the home folder that you’ve chosen to put the jar file of StoreClass in.
Format: load pa/FILENAME
Example: load pa/mybook.json
The file name must end with “.json”, must not contain any slashes “/” and must point to an existing StoreClass .json file.
There should be only one file name provided.
When you call
archive or load, the undo/redo history is cleared to prevent inconsistencies between the address book data and the stored history. Always ensure the current state is saved before performing these actions.
Clearing all entries : clear
You can all the current entries in StoreClass with this command.
Format: clear
Exiting the program : exit
You can exit the program with this command.
Format: exit
Autocomplete
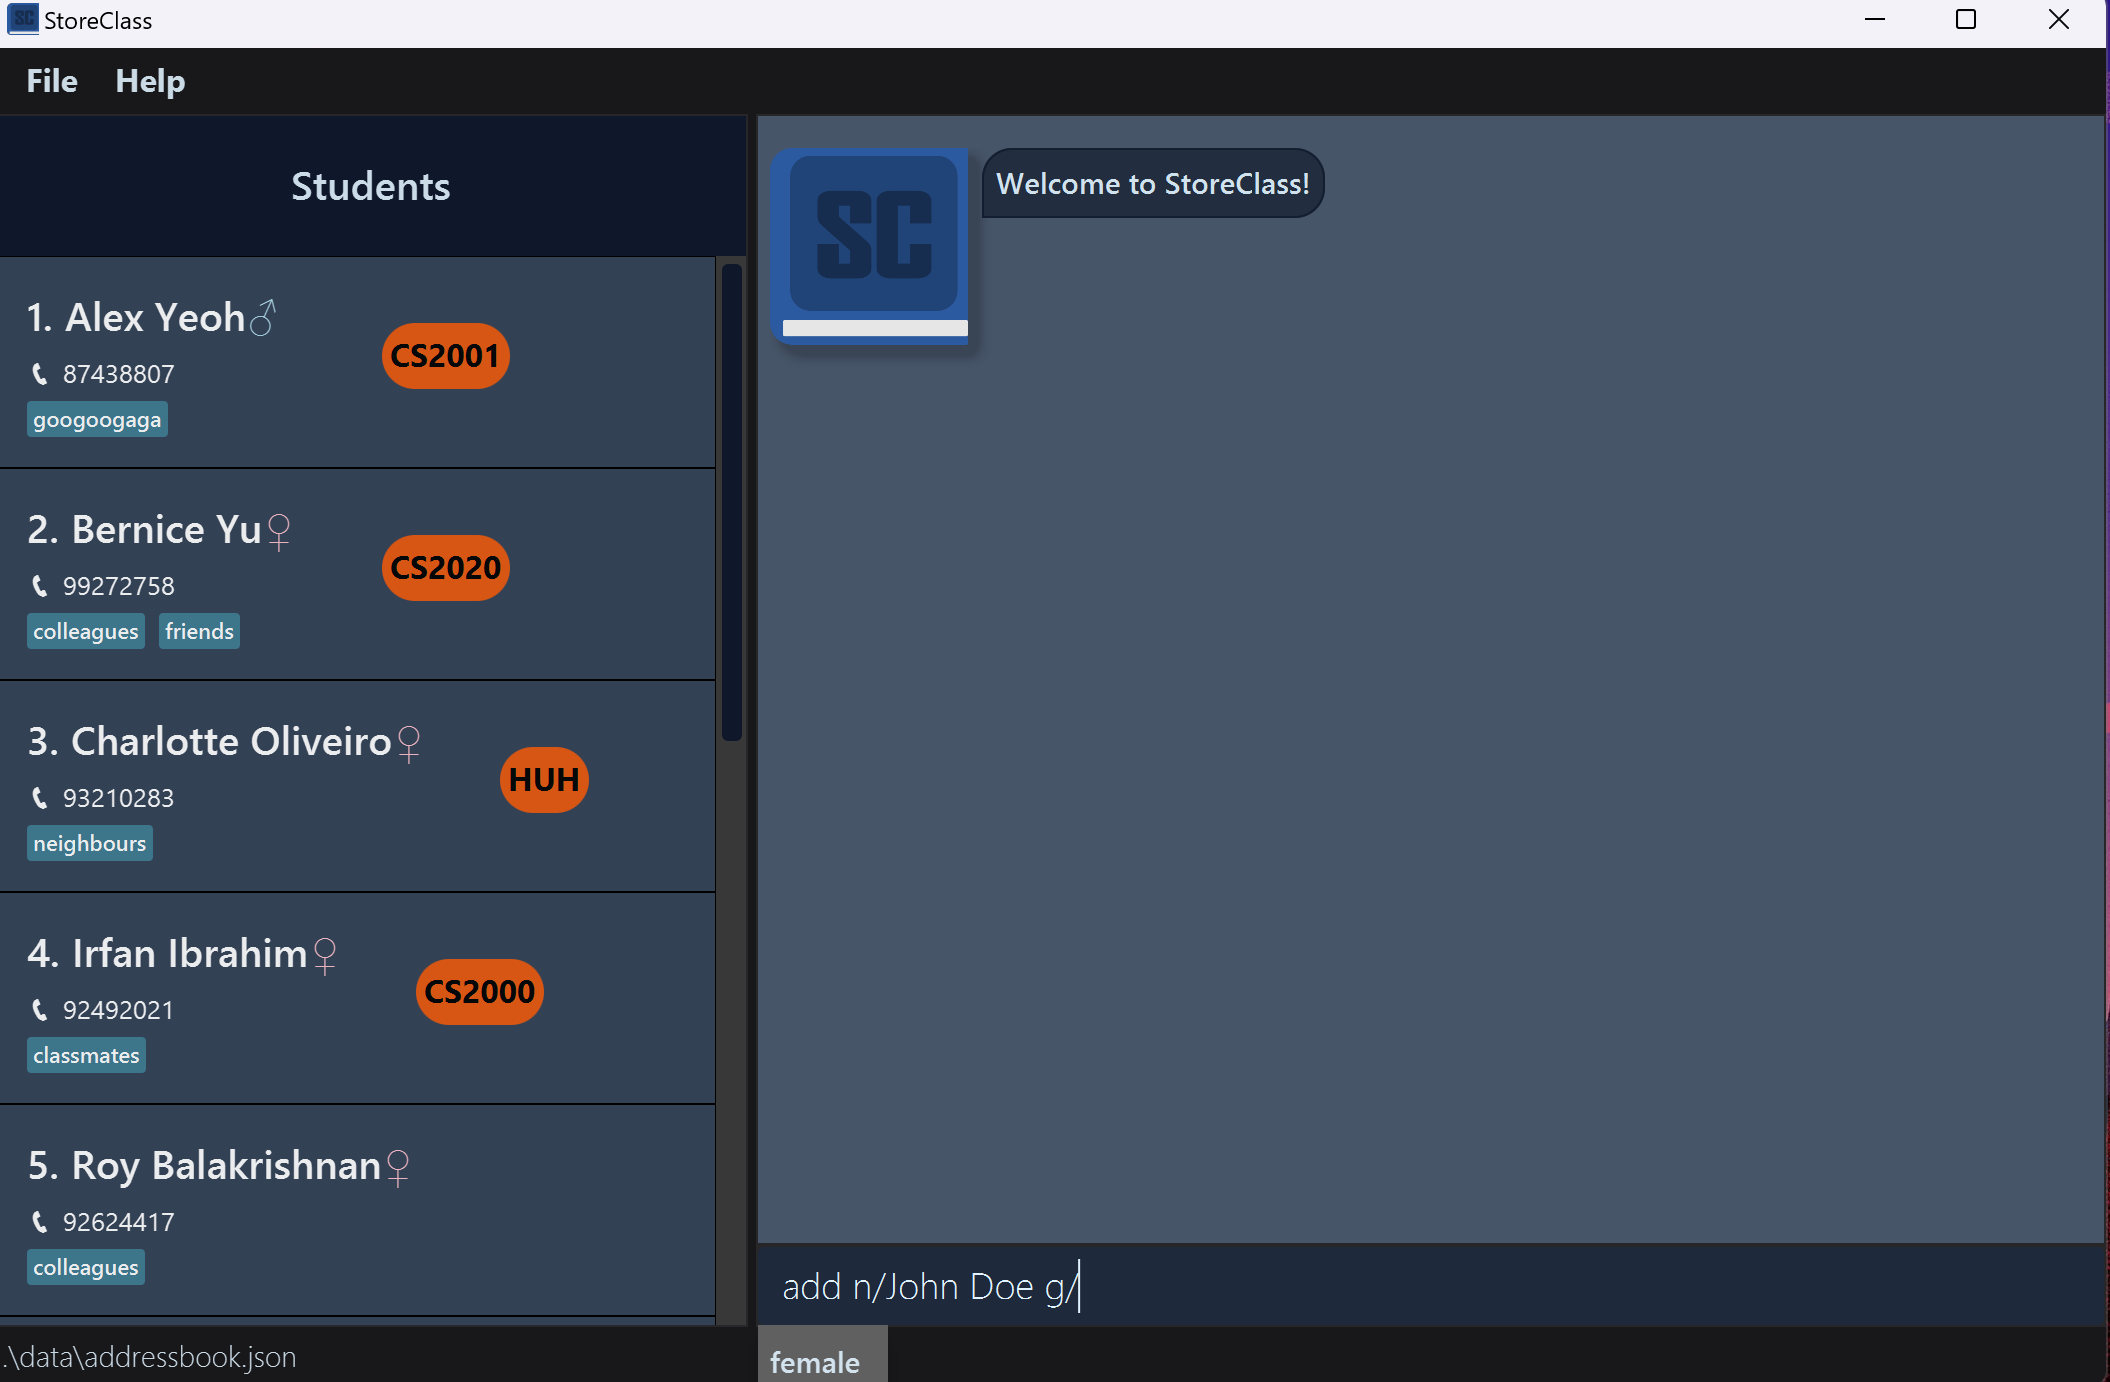
The Autocomplete feature provides real-time command suggestions as you type, helping you quickly and accurately enter commands. Autocomplete identifies keywords and suggests matches, allowing you to streamline input by selecting from relevant options instead of typing full commands or field values.
How It Works
Autocomplete operates based on the word at your current caret position:
- As you begin typing a command or field, suggestions will appear that match the word under your current caret position. For example, typing
adwill display a list of commands beginning withad, likeadd.- Autocomplete matches with the text characters before your caret position of the word under your current caret position. For example, when typing in the command keyword
adand you move your cursor betweenaandd, Autocomplete will show you all commands starting witha. You can utilize this to do some cool tricks as explained in the tips section below.
- Autocomplete matches with the text characters before your caret position of the word under your current caret position. For example, when typing in the command keyword
- Autocomplete for command keywords e.g.
clear,delete,addapplies only to the first word you type in the command box. This initial word is treated as the command. - Autocomplete for student fields applies to all subsequent words after the first word. All subsequent words after the first are treated as student fields with specific prefixes, e.g.
m/Math,g/male
Supported Commands
Autocomplete supports all existing command keywords when matching.
Supported Fields
Autocomplete currently supports the following fields with these prefixes:
| Prefix | Field | Description |
|---|---|---|
m/ |
Modules | Matches all existing module names |
t/ |
Tags | Matches all existing tags |
g/ |
Gender | Matches gender values: male or female
|
pa/ |
File Paths | Matches all existing archived file paths |
When these prefixes are detected, Autocomplete automatically displays a list of suggestions related to these fields. The list of suggestions are generated through the existing list of students inside StoreClass.
Example Usage
If you begin typing edit 1 m/M, Autocomplete will provide suggestions for available modules starting with the letter M, helping you to quickly select the correct module name. Similarly, typing t/ after the command will bring up a list of tags, allowing you to specify tags accurately without needing to remember or retype exact names.
m/, t/ or pa/? Autocomplete searches for suggestions relevant to these fields based on the existing data in StoreClass. If there are no data or students inside StoreClass, then no suggestions will be generated for these fields. This usually occurs after a
clear command.
![]() Tips: for Efficient Usage
Tips: for Efficient Usage
-
Start with the command: Autocomplete only activates for commands when typing the first word.
-
Remember to use prefixes: For fields, make sure to use the correct prefix (
m/,t/,g/,pa/) to activate Autocomplete for those fields.
-
Select from suggestions using arrow keys: Save time by selecting from the suggestion list using arrow keys rather than typing full names or values.
- Typos: When you accidentally type in the wrong name for an existing field, instead of holding backspace and retyping the entire field, simply move the caret position over to the prefix, and select from the list of suggestions. Autocomplete will replace the entire field with your selection for you.
By utilizing Autocomplete, you can input commands more quickly, reduce typos, and improve your overall efficiency in navigating the software!
Saving the data
StoreClass data are saved in the hard disk automatically after any command you enter that changes the data. There is no need to save manually!
Editing the data file
StoreClass data are saved automatically as a JSON file [JAR file location]/data/addressbook.json. Advanced users are welcome to update data directly by editing that data file.
Furthermore, certain edits can cause the StoreClass to behave in unexpected ways (e.g., if a value entered is outside of the acceptable range). Therefore, edit the data file only if you are confident that you can update it correctly.
FAQ
Q: How do I transfer my data to another Computer?
A: Install the app in the other computer and overwrite the empty data file it creates with the file that contains the data of your previous StoreClass home folder.
Known issues
-
When using multiple screens, if you move the application to a secondary screen, and later switch to using only the primary screen, the GUI will open off-screen. The remedy is to delete the
preferences.jsonfile created by the application before running the application again. -
If you minimize the Help Window and then run the
helpcommand (or use theHelpmenu, or the keyboard shortcutF1) again, the original Help Window will remain minimized, and no new Help Window will appear. The remedy is to manually restore the minimized Help Window. - After inputting a command, the scroll bar in the command box becomes unresponsive. The remedy is to click on the scroll bar to make it responsive again.
- When the UI window is set to a small size certain element in the UI maybe hard to view. E.g. modules, long names… Hence, we recommend you to use a large screen and a large window size when using our product so that all the fields can be viewed clearly.
Command summary
| Action | Format, Examples |
|---|---|
| Add |
add n/NAME p/PHONE g/GENDER m/MODULE... [t/TAG]… e.g., add n/James Ho g/male p/83216574 m/English m/Chemistry t/new t/IB
|
| Clear | clear |
| Delete |
delete INDEXe.g., delete 3
|
| Edit |
edit INDEX [n/NAME] [p/PHONE] [g/GENDER] [m/MODULE] [t/TAG]…e.g., edit 2 n/James Lee
|
| Find |
find KEYWORD [MORE_KEYWORDS]…e.g., find James Jake
|
| Filter |
filter [n/NAME] [p/PHONE] [g/GENDER] [t/TAG]… [m/MODULE]…e.g., filter n/James
|
| Grade |
grade INDEX m/MODULE s/GRADEe.g., grade 1 m/History s/85
|
| Undo | undo |
| Redo | redo |
| List | list |
| Help | help |
| Archive | archive pa/FILENAME |
| Load | load pa/FILENAME |